You understand the theory behind how to track viral loop, but theory doesn’t build growth engines. Code does. This guide provides the definitive technical implementation details needed to accurately track a viral loop and calculate its performance in your iOS or Android app. Accurate viral loop analytics are the difference between a hopeful feature and a predictable, scalable acquisition channel.
This is not a strategic “why” article; it is a tactical “how-to” guide for engineers. We will provide clear, copy-pasteable code concepts to show you exactly how to instrument every stage of the loop and then use that data to calculate essential viral metrics like the K-factor.
Table of Contents
The Anatomy of How To Track Viral Loop
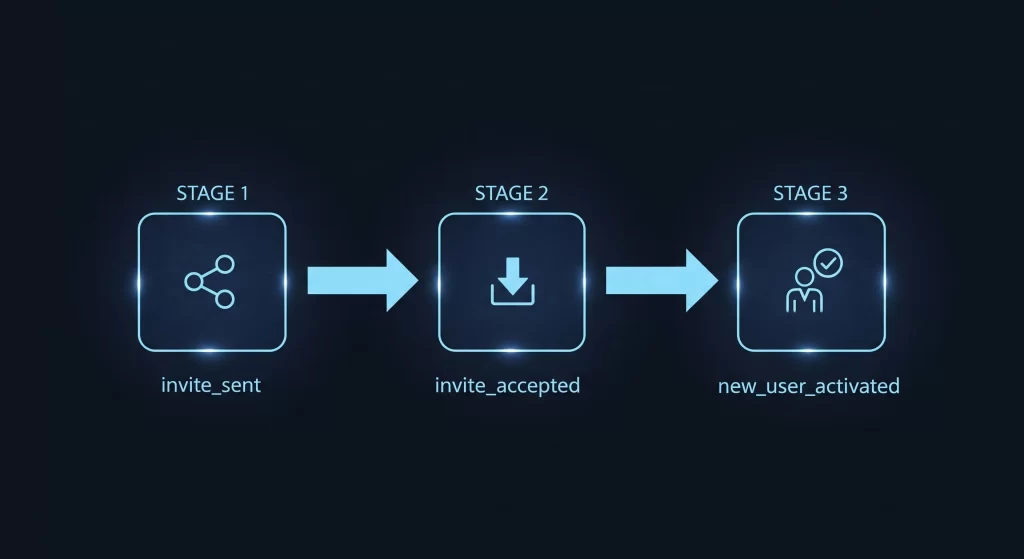
To effectively measure and optimize a viral loop, you cannot treat it as a single action. You must break it down into a funnel of distinct, trackable events. A complete, measurable loop consists of three core events:
invite_sent: An existing user successfully shares their unique invitation link. This is the top of your viral funnel.invite_accepted: A new user installs and opens the app for the first time via an invitation link. This is your core attribution event.new_user_activated: The new user performs the key action that defines a “successful” conversion (e.g., completes onboarding, starts a trial, makes a purchase).
By instrumenting each of these events, you can precisely measure the performance of your loop and identify areas for improvement.
Step-by-Step Implementation with Tapp
This section provides the core code concepts for instrumenting your viral loop. For more context on different types of loops, see these 10 Viral Loop Examples from Top Apps.
Step 1: Generating the Unique Invite Link
Every invitation must have a unique link that contains data identifying the sender. This is generated via an API call from your client or backend to Tapp when a user initiates a share.
// Example API Call to Tapp
POST https://api.tapp.so/v1/links
Authorization: Bearer YOUR_API_KEY

{
  "ios_target": "yourapps-scheme://",
  "android_target": "yourapps-scheme://",
  "params": {
    "referrer_id": "USER_ID_12345",
    "campaign": "summer_referral_2025"
  }
}
The API returns a unique short link (e.g., https://tapp.so/abcde) that you pass into the native share sheet.
Step 2: Tracking the ‘Invite Sent’ Event
As soon as the user successfully shares the link (the share sheet is dismissed), you should fire an event to track it. This event is the numerator for calculating your invitation rate (`i`).
iOS (Swift)
// In the completion handler of your UIActivityViewController
Tapp.trackEvent("invite_sent", properties: ["campaign": "summer_referral_2025"])
Android (Kotlin)
// After the share intent has been successfully launched
val properties = mapOf("campaign" to "summer_referral_2025")
Tapp.trackEvent("invite_sent", properties)
Step 3: Attributing the Install (‘Invite Accepted’)
When a new user opens the app for the first time after clicking a Tapp link, the SDK retrieves the original parameters. This is the most critical step for attribution.
iOS (Swift)
// Implement the TappsoDelegate method in your AppDelegate
func tappso(didResolve deeplink: Tappso.Deeplink) {
    // Check if this is the first launch for this user
    if deeplink.isFirst {
        if let referrerId = deeplink.params["referrer_id"] as? String {
            // This is an 'invite_accepted' event.
            // Associate this new user with the referrerId in your backend.
            MyAnalytics.saveAttribution(referrer: referrerId)

            // You can also track this event directly
            Tapp.trackEvent("invite_accepted", properties: ["referrer_id": referrerId])
        }
    }
}
Android (Kotlin)
// In your main Activity's onCreate or onNewIntent
Tappso.getDeeplink(intent) { deeplink ->
    deeplink?.let {
        if (it.isFirst) {
            val referrerId = it.params["referrer_id"] as? String
            if (referrerId != null) {
                // This is an 'invite_accepted' event.
                // Associate this new user with the referrerId in your backend.
                MyAnalytics.saveAttribution(referrerId)

                // You can also track this event directly
                Tapp.trackEvent("invite_accepted", mapOf("referrer_id" to referrerId))
            }
        }
    }
}
At this point, you have successfully attributed the new user to the referrer. The total count of these events is the denominator for your conversion rate (`c`).
Step 4: Tracking the ‘New User Activated’ Event
Finally, you must track when the new user performs the valuable action that qualifies them as a successful referral. This might be completing onboarding, starting a trial, or making a purchase.
iOS (Swift)
// When the new user completes the target action
Tapp.trackEvent("new_user_activated", properties: ["activation_type": "trial_started"])
Android (Kotlin)
// When the new user completes the target action
val properties = mapOf("activation_type" to "trial_started")
Tapp.trackEvent("new_user_activated", properties)
The total count of these events is the numerator for your conversion rate (`c`).

From Data to Insight: How to Calculate K-Factor & Other Viral Metrics
With these four events instrumented, you now have all the raw data needed for your viral loop analytics. You can now reliably calculate your key viral metrics.
Invitation Rate (i)
This tells you how many invites each active user sends on average.
Formula: i = (Total "invite_sent" events in a period) / (Number of Active Users in that period)
Example: If you had 10,000 active users in a month and they sent 15,000 invites, your `i` = 1.5.
Conversion Rate (c)
This tells you what percentage of invites turn into valuable new users.
Formula: c = (Total "new_user_activated" events in a period) / (Total "invite_sent" events in that period)
Example: If those 15,000 invites resulted in 750 new activated users, your `c` = 750 / 15,000 = 0.05 (or 5%).
How to Calculate K-Factor
Now you can combine `i` and `c` to get your viral coefficient.
Formula: K = i * c
Example: Using the numbers above, your K-Factor would be `1.5 * 0.05 = 0.075`.
Cycle Time
This measures how long it takes for a new user to become an inviting user, which indicates the speed of your loop.
Calculation: For each user who sends an invite, calculate the time difference: `(Timestamp of their first “invite_sent” event) – (Timestamp of their “invite_accepted” event)`. The average of this difference across all users is your cycle time.
Frequently Asked Questions (FAQ)
How often should I calculate my K-factor?
You should monitor your K-factor as part of your regular growth metrics review, typically on a weekly or monthly basis. Calculating it for specific cohorts (e.g., users who signed up in May) is also highly effective for understanding how product changes impact virality over time.
What’s the difference between tracking an install vs. an activation?
An install (`invite_accepted`) simply means the app was downloaded and opened. An activation (`new_user_activated`) means the user performed a valuable action. For most viral loops, especially incentivized ones, you should always base your conversion on activation, not just installation, to ensure you are rewarding for real value.
Where should I store the attribution data (e.g., referrer_id)?
Upon receiving the `referrer_id` from the Tapp SDK on first open, you should immediately send it to your own backend server and associate it with the new user’s record in your database. This creates a permanent, first-party record of the attribution that you own and control.
How can I use these metrics to improve my viral loop?
By breaking down K-factor into `i` and `c`, you can identify your weak points. If `i` is low, you need to work on making the share prompt more visible or compelling. If `c` is low, you need to improve the onboarding experience for new referred users or adjust the incentive.
Conclusion
To effectively track a viral loop, you must move beyond hope and into the realm of precise engineering. Instrumenting every single step of the funnel—from the initial share to the final conversion—is the only way to get the reliable data needed for true viral loop analytics. This allows you to stop guessing and start optimizing.
Tapp provides the purpose-built attribution engine that makes this level of granular tracking possible. It gives you the tools to not only build a viral loop but to measure it, understand it, and improve it with confidence.
Stop guessing and start engineering. Explore the Tapp blog to see the full power of our attribution engine.
To understand the strategic theory behind this implementation, read our full Engineer’s Guide to Creating Viral Loops for App Growth.